How New Zealand Trail Types Shape the Ride
Riding here means navigating one of the most varied trail menus on the planet, and knowing what you're choosing before you clip in makes a real difference.
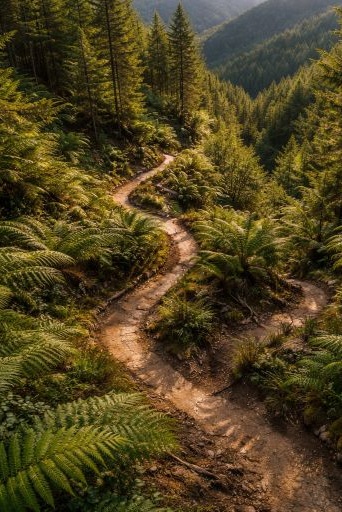
Singletrack
The backbone of New Zealand mountain biking. Narrow, purpose-built ribbon trails wind through pine forests on the South Island and native bush on the North, typically 45–60 cm wide with tight corners, rooted surfaces, and short punchy climbs. Intermediate fitness and basic bike-handling skills are the entry point.
Downhill Trails
Purpose-built for descending, these trails prioritize speed and technical challenge over distance. Expect steep grades, rock gardens, berms, and drops. Volcanic terrain around Rotorua produces some of the country's most aggressive downhill lines.
Cross-Country Routes
XC riding covers real ground. Expect sustained climbs, mixed surfaces, and distances ranging from 20 to 60 kilometers. High country stations in Canterbury and Otago offer classic XC terrain: open tussock, gravel doubletrack, and exposed ridgelines.
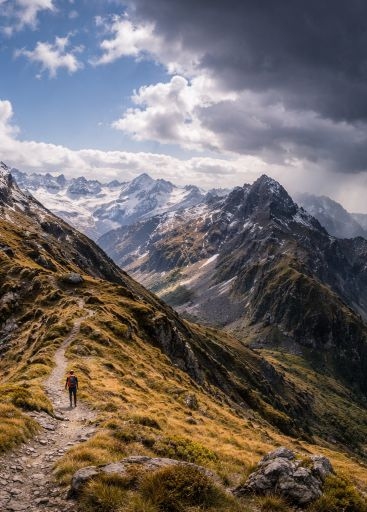
Alpine Trails
Above the treeline, trails get raw. Rocky, exposed, and weather-dependent, alpine routes demand solid navigation skills and the fitness to handle sudden condition changes. The Mackenzie Basin and Remarkables area are typical settings.
Forest Tracks and Gravel Routes
Gravel roads and DoC forest tracks suit riders easing into off-road riding. Surfaces are predictable, gradients manageable, and navigation straightforward. Plenty of Waikato and Marlborough routes fall here.
Backcountry Riding
Remote, unmarked, and unforgiving. Backcountry routes cross high country stations, river valleys, and mountain passes with no trail crew maintaining them. Self-sufficiency is non-negotiable.
Choose Routes That Match Your Skills and Bike Setup
Choosing the right route is one of the most important parts of safe and enjoyable mountain biking. In New Zealand, trail networks can vary widely in surface, gradient, exposure, and technical features, so riders should consider both their experience level and the type of bike they are using before setting off.
Reading Trail Grades Before You Ride
Most New Zealand trail networks use a five-grade colour system, from green (easiest) to double black diamond (expert). These grades reflect technical difficulty, not distance or physical effort. A grade-three blue trail can still destroy your legs over 30 kilometres of climbing. Always consider both dimensions separately.
Elevation gain tells you how hard your body will work. Technical grade tells you whether your skills can handle what the trail throws at you. A long, flat gravel track through Otago might be physically easy but take four hours. A short, steep descent in Rotorua's Whakarewarewa Forest might cover two kilometres and demand serious bike handling. Neither is harder in any universal sense.
Matching Your Bike to the Terrain
Wider tyres genuinely help on specific surfaces. On sand, snow, mud, and loose gravel, a 2.4-inch or larger tyre improves traction and float significantly. Fat-tyre bikes with 4-inch-plus rubber are built for soft, unstable ground where a standard tyre would sink or slip.
On packed gravel or hardpack singletrack, though, fat tyres start working against you. Rolling resistance increases, and the bike feels sluggish. There's no denying that some riders overfit their bikes for the terrain they actually ride. A 2.3-inch trail tyre handles most New Zealand conditions well. Reserve the fat setup for genuinely soft or technical backcountry routes where the extra grip earns its weight.
Plan for Weather, Navigation, and Backcountry Safety
New Zealand's mountain weather can shift from clear skies to sleet inside an hour, especially in the Southern Alps and central North Island ranges. Before any backcountry ride, check MetService and the Mountain Forecast for your specific area rather than a regional summary. A sunny morning in Queenstown doesn't tell you much about conditions above 1,500 metres by early afternoon.
Navigation and Emergency Gear
Carry a downloaded offline map on your phone and a physical topo map as backup. GPS units are reliable, but batteries die and screens crack. Tell someone your planned route and expected return time before you leave. If you're riding solo in remote terrain, a personal locator beacon is worth the weight.
Layers, Food, and First Aid
Pack a waterproof shell even on warm days. Hypothermia risk rises fast once you stop moving and the wind picks up. A basic first-aid kit should include bandages, blister pads, a thermal emergency blanket, and any personal medication. Carry more water than you think you'll need, and know where streams are on your route map.
Responsible Riding in Remote Areas
Start early enough to finish before dark. Wet trails erode quickly, so turn back if conditions deteriorate rather than pushing through. Respect closures after heavy rain. Heli-biking accesses terrain that most riders never reach, but it demands strong technical skills, thorough self-rescue knowledge, and honest awareness of environmental impact on fragile alpine zones.
Ride New Zealand With Confidence and Curiosity
From the sculpted flow trails of Queenstown to the raw alpine singletrack above Arthur's Pass, there's no shortage of terrain to explore here, but the best ride you'll ever do is the one that honestly matches where you're at. Read the trail grade before you commit, check the weather before you head into the backcountry, and give yourself room to turn back without it feeling like failure. Conservative planning isn't timid riding; it's what keeps the adventure going. Build your skills on well-marked forest tracks, then push gradually into more demanding country as your confidence grows. Every region in New Zealand offers something different, and that variety rewards riders who take the time to understand what they're getting into before they clip in and roll out.